Thank you to my friend Dave ZS6AZP and the Centurion Radio Amateur Club ZS6CEN for allowing me to post a blog covering Dave's recent QRPexpedition. As usual Dave projects a 'no compromise' approach and a field operation in the true spirit of Amateur Radio (IMHO).
Check out the details at this link. Fun in the sun with ZS6AZP
I especially like the pool pole antenna support :)
Thanks Dave!
72 de Dick N4HAY
Showing posts with label My Knightlife. Show all posts
Showing posts with label My Knightlife. Show all posts

19 August 2015
Improving PCB enclosure building
I was recently inspired by the fantastic website of K7QO to try to do something to improve my PCB enclosure building, both from an efficiency perspective as well as from a neatness point of view.
I built a fixture in accordance with Chuck's directions on building enclosures and it turned out very well. Last night I was able to test solder together two sides using a piece of 24AWG insulated wire to ensure that the angle was 90 degrees once the solder dried (see pics below). I used a 30W Weller iron. I found that the technique worked better by having the vertical piece of PCB mating directly with the bottom of the fixture and in front of the 24AWG wire.
Much as I would love to own a shear I found that I could accurately cut PCB's to exact size using my table saw. More on that later when I get to build a prototype enclosure as the next step.
Thanks to Chuck for sharing his extensive knowledge with us.
I built a fixture in accordance with Chuck's directions on building enclosures and it turned out very well. Last night I was able to test solder together two sides using a piece of 24AWG insulated wire to ensure that the angle was 90 degrees once the solder dried (see pics below). I used a 30W Weller iron. I found that the technique worked better by having the vertical piece of PCB mating directly with the bottom of the fixture and in front of the 24AWG wire.
 |
| Enclosure Fixture as per K7QO. The walls are a bit high. A lot of time was spent ensuring that the corner consisted of all 90 degree angles. |
Much as I would love to own a shear I found that I could accurately cut PCB's to exact size using my table saw. More on that later when I get to build a prototype enclosure as the next step.
Thanks to Chuck for sharing his extensive knowledge with us.
 |
| A piece of insulated 24AWG wire is used to compensate for the solder shrinkage |
 |
| Clamps are used to hold the pieces in place |
 |
| The 'shrinkage compensating angle' can be clearly seen |
 |
| Completed prototype effort. In fact the thinner black wire resulted in a better right angle finish |
04 August 2015
Adventure Radio Society Spartan Sprint August 2015
Great fun was had in the Spartan Sprint Contest last night Monday evening. Spartan Sprint Rules.
I operated my old trusty ATS3 rig into a BLTuner feeding an inverted Vee 80m doublet up about 55ft at the apex. Power output at the beginning of the contest was 2Watts on 40m and 20m. The battery was a 750mAH Li Po battery as the power with a set of mini paddles and earbuds. The total weight for this setup was 13.4oz (0.838lbs) of which 7oz was attributed to the ATU! There is definitely room for improvement and weight loss with my station.
QTH is near Raleigh NC operating from the kitchen table since it was extremely hot outside.
Band conditions were good and I was able to work all stations copied. 20m was excellent for the first hour and then switched to 40m. QRN was high on 40m but the signals were strong. Towards the last 30 minutes I switched back to 20m but no signals were copied. In particular I enjoyed the contacts with N4SX (1 Watt on 40m in GA) and KA5QQA (1 Watt on 20m in TX).
Thanks to all for another great Spartan Sprint evening.
RESULTS
Total weight = 13.40oz = 0.838lbs
20m QSOs = 15
40m QSO's = 11
Total QSO's = 26
QSO's per Lb = 31.03


I operated my old trusty ATS3 rig into a BLTuner feeding an inverted Vee 80m doublet up about 55ft at the apex. Power output at the beginning of the contest was 2Watts on 40m and 20m. The battery was a 750mAH Li Po battery as the power with a set of mini paddles and earbuds. The total weight for this setup was 13.4oz (0.838lbs) of which 7oz was attributed to the ATU! There is definitely room for improvement and weight loss with my station.
QTH is near Raleigh NC operating from the kitchen table since it was extremely hot outside.
Band conditions were good and I was able to work all stations copied. 20m was excellent for the first hour and then switched to 40m. QRN was high on 40m but the signals were strong. Towards the last 30 minutes I switched back to 20m but no signals were copied. In particular I enjoyed the contacts with N4SX (1 Watt on 40m in GA) and KA5QQA (1 Watt on 20m in TX).
Thanks to all for another great Spartan Sprint evening.
RESULTS
Total weight = 13.40oz = 0.838lbs
20m QSOs = 15
40m QSO's = 11
Total QSO's = 26
QSO's per Lb = 31.03


28 July 2015
Flight of the Bumblebees 2015. N4HAY. Jordan Lake NC
I really enjoyed the FOBB this year. Unlike last year the bands were in good shape and the wx was beautifully mild. I set up in roughly the same spot as last year only this time I deployed a far superior antenna system. My operation did not involve a major trek since I merely walked from the car park to a nearby picnic table. Oh well perhaps next year I will commit to more of an adventure hi.
The FOBB was held on Sunday afternoon from 1pm - 5pm Eastern time zone. Check out the following link for The Adventure Radio Society Flight of the Bumblebees details of the contest rules.
I set up at the Ebeneezer State Park at Jordan Lake North Carolina. This is about a 20minute drive from my QTH. I arrived on site at noon. First I had to build a 40m dipole. I was not well prepared for this contest! I then deployed my 20m and 40m dipoles. This turned out to be more of a challenge than I had judged. Thus I was only QRV an hour into the contest. However once my antennas were deployed they were very effective. My 40m dipole was beaming N-S and was up about 55 ft agl. My 20m dipole was beaming W-E and was up about 45ft. I used my trusty slingshot to launch the antennas to this height.
Rig was a K2 running on the internal battery. I ran a frequency and S&P about 50/50. Battery indicated voltage on the K2 was down to 11volts by the end of the contest.
Band conditions were good and I was able to work almost all stations that I heard. I had the feeling that I could have done better with a W-E facing 40m dipole. Lesson learnt here was to stick to a simple inverted-vee doublet center-fed with ladder line next time. Ideally deployed in such a way that I could change the orientation easily. I am sure I could have done better if I had been better prepared.
I also had problems with my pen that would not write properly! This brings to mind the reason why early astronauts used pencils on their early missions hi!
I was unable to copy my fellow Knights from the Knightlites QRP club Sirs Derek W4FI, JP AB4PP and Paul AA4XX indicating that the 40m band was long.
I look forward to next year's adventure with much anticipation. Many thanks to all stations who worked N4HAY. 72 de Dick.
Log of N4HAY. FOBB 2015. Jordan Lake
The FOBB was held on Sunday afternoon from 1pm - 5pm Eastern time zone. Check out the following link for The Adventure Radio Society Flight of the Bumblebees details of the contest rules.
I set up at the Ebeneezer State Park at Jordan Lake North Carolina. This is about a 20minute drive from my QTH. I arrived on site at noon. First I had to build a 40m dipole. I was not well prepared for this contest! I then deployed my 20m and 40m dipoles. This turned out to be more of a challenge than I had judged. Thus I was only QRV an hour into the contest. However once my antennas were deployed they were very effective. My 40m dipole was beaming N-S and was up about 55 ft agl. My 20m dipole was beaming W-E and was up about 45ft. I used my trusty slingshot to launch the antennas to this height.
Rig was a K2 running on the internal battery. I ran a frequency and S&P about 50/50. Battery indicated voltage on the K2 was down to 11volts by the end of the contest.
Band conditions were good and I was able to work almost all stations that I heard. I had the feeling that I could have done better with a W-E facing 40m dipole. Lesson learnt here was to stick to a simple inverted-vee doublet center-fed with ladder line next time. Ideally deployed in such a way that I could change the orientation easily. I am sure I could have done better if I had been better prepared.
I also had problems with my pen that would not write properly! This brings to mind the reason why early astronauts used pencils on their early missions hi!
I was unable to copy my fellow Knights from the Knightlites QRP club Sirs Derek W4FI, JP AB4PP and Paul AA4XX indicating that the 40m band was long.
I look forward to next year's adventure with much anticipation. Many thanks to all stations who worked N4HAY. 72 de Dick.
Log of N4HAY. FOBB 2015. Jordan Lake
 |
| N4HAY. FOBB 2015. Suffering no pain! |
18 July 2015
Field Day 2015. WQ4RP. The Knightlites
As in all previous years for me, Field Day 2015 with The Knightlites was a total pleasure! A great adventure and an opportunity to learn and appreciate the challenges presented from operating in the great outdoors in less than ideal circumstances. Certainly that was the case this year!
Four intrepid Knights Sirs Derek W4FI, Joe WA4GIR, JP AB4PP and Dick N4HAY operated Field Day as WQ4RP, Class 3A Battery, NC from the Holly Point State Park at Falls Lake North Carolina.
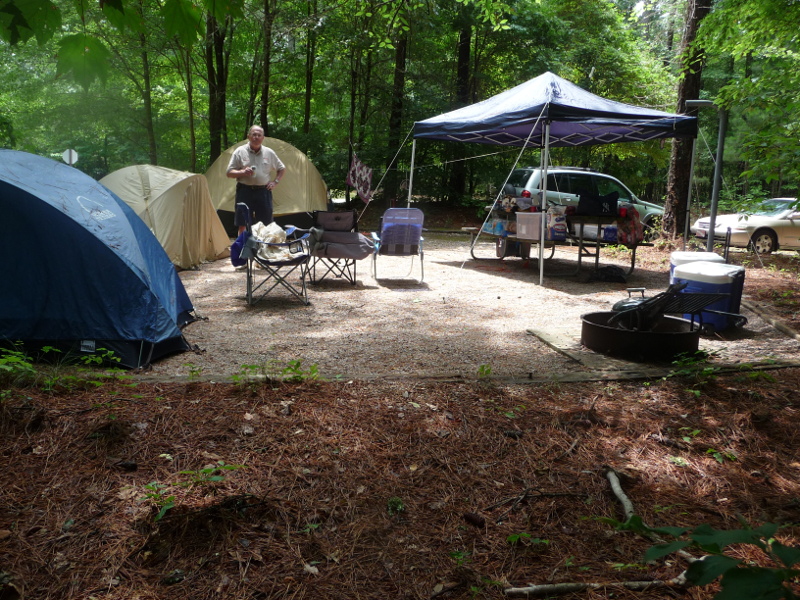 |
| The Great Setup. Pics by Joe WA4GIR |
 |
| Sir JP and Sir Derek before the action began. Pic by W4CHX Karl |
Violent thunderstorms on Friday evening, and Saturday, destroyed a tent and relegated some of the Knights to sleeping in their cars. But the intrepid few remained at the Key...Sending and Receiving in spite of it all! Great adventure, camaraderie and plain good fun was had for sure.
Some finer details of the event.
Background
Results
Operating Conditions
Lessons Learned
Inventory Checklist
DUP Sheet
Here find Band analytical information:
10 meters
15 meters
20 meters
40 meters
80 meters
All Bands
 |
| MRE's issued by Sir JP just in case. Pic by W4CHX Karl |
 |
| A shelter destroyed by a violent thunderstorm. Pic by JP AB4PP |
 |
| 20m operating position. |
 |
| 20m operation position. Pic by Joe WA4GIR |
 |
| Sir Derek WF4I pounding the key on 20m on Sunday morning |
 |
| 40M operating position. Pics Joe WA4GIR |
 |
| Sir JP at the key. 80m, 15m, 10m operating position. Pic by Joe WA4GIR |
 |
| Mason (or Consul) Jar LED lamp. A South African product |
 |
| The Knight's Trebuchet built by Sir Gary N3GO. This weapon gave us at least a 3dB advantage! |
Background
Results
Operating Conditions
Lessons Learned
Inventory Checklist
DUP Sheet
Here find Band analytical information:
10 meters
15 meters
20 meters
40 meters
80 meters
All Bands
 |
| WQ4RP The Knightlites. Field Day 2015 QTH. Pic by W4CHX Karl |
01 October 2014
Checking the calibration of my squarewave & sinewave calibrators and AD8307 rf power meter
At our recent QRP club show-n-tell activity I was fortunate to be able to check the calibration of my home brew instruments. For this exercise an HP Spectrum Analyzer (model unknown) belonging to Gary, N3GO, was used to check my 10MHz, -10dBm squarewave calibrator and my 11MHz -10dBm, sinewave calibrator (see a previous post for details of these two units).
I have also been lent (on a longterm loan by Chris KD4PBJ) an HP Signal generator HP8657B. Herewith are the results of the calibration check of my homebrew AD8307 rf power meter.
As can be seen below. The results are not consistent.
10MHz, -10dBm squarewave calibrator
Fundamental -12.56dBm (54.9uW)
Third -23.05dBm (5uW)
Fifth -27.76dBm (1.68uW)
Second -39.9dBm
Fourth -40.13dBm
Total = 61.78uW This is equivalent to -12.09dBm
Thus this shows a reading that is 2.09dB lower than the nominal 'calibrated' value of -10dBm. The -10dBm level was calibrated using a DC calibration technique.
Next we measured the sinewave generator
11MHz, -10dBm sinewave calibrator
Fundamental -8.77dBm
Second -39.69dBm
Third -48.53dBm
Fourth -58.34dBm
Thus this shows a reading that is 1.23dB higher that the nominal 'calibrated' value of -10dBm.
The tables below show measurement comparisons between the power meter and the scope readings. This result shows good correlation. It is reasonable to assume that the HP8657B signal generator is accurate to tolerances significantly in excess of the power meter or the scope. This shows a maximum deviation of 0.53dB. This is much better than the comparisons above!
Next I will ask Gary if we can run the tests once again. Check the HP8657B against Gary's Spectrum Analyzer.

I have also been lent (on a longterm loan by Chris KD4PBJ) an HP Signal generator HP8657B. Herewith are the results of the calibration check of my homebrew AD8307 rf power meter.
As can be seen below. The results are not consistent.
10MHz, -10dBm squarewave calibrator
Fundamental -12.56dBm (54.9uW)
Third -23.05dBm (5uW)
Fifth -27.76dBm (1.68uW)
Second -39.9dBm
Fourth -40.13dBm
Total = 61.78uW This is equivalent to -12.09dBm
Thus this shows a reading that is 2.09dB lower than the nominal 'calibrated' value of -10dBm. The -10dBm level was calibrated using a DC calibration technique.
Next we measured the sinewave generator
11MHz, -10dBm sinewave calibrator
Fundamental -8.77dBm
Second -39.69dBm
Third -48.53dBm
Fourth -58.34dBm
Thus this shows a reading that is 1.23dB higher that the nominal 'calibrated' value of -10dBm.
The tables below show measurement comparisons between the power meter and the scope readings. This result shows good correlation. It is reasonable to assume that the HP8657B signal generator is accurate to tolerances significantly in excess of the power meter or the scope. This shows a maximum deviation of 0.53dB. This is much better than the comparisons above!
Next I will ask Gary if we can run the tests once again. Check the HP8657B against Gary's Spectrum Analyzer.
29 July 2014
Adventure Radio Society Flight of the Bumblebees 2014
I operated in this fun event which is sponsored by the Adventure Radio Society and known as the 'Flight of the Bumblebees'. This year I was Bumblebee #94.
http://arsqrp.blogspot.com/
This is a 4 hour event where QRP stations operate from the field for a period of 4 hours. The operating time this year being Sunday July 27th from 1pm - 5pm eastern.
I set up in a lovely spot overlooking Lake Jordan which is about 20 minutes from our home. Using my trusty Norcal 40A and an End-Fed Halfwave. The weather was hot and humid but with a slight breeze.
Band conditions were terrible (to use an understatement). There were a number of stations that I copied that could not copy me. There was a period of an hour in the middle of the contest where I failed to make a contact hi! I know that Paul AA4XX who was operating from Topsail Island NC experienced the same poor band conditions.
Always an enjoyable event and a nice chance to get out into the woods.
Lets hope the Skeeter Contest in August will see better condx.


http://arsqrp.blogspot.com/
This is a 4 hour event where QRP stations operate from the field for a period of 4 hours. The operating time this year being Sunday July 27th from 1pm - 5pm eastern.
I set up in a lovely spot overlooking Lake Jordan which is about 20 minutes from our home. Using my trusty Norcal 40A and an End-Fed Halfwave. The weather was hot and humid but with a slight breeze.
Band conditions were terrible (to use an understatement). There were a number of stations that I copied that could not copy me. There was a period of an hour in the middle of the contest where I failed to make a contact hi! I know that Paul AA4XX who was operating from Topsail Island NC experienced the same poor band conditions.
Always an enjoyable event and a nice chance to get out into the woods.
Lets hope the Skeeter Contest in August will see better condx.
26 July 2014
Excalibur 2 Project. Final Takedown.
Today was a good day at Excalibur 2. The weather was hot and steamy!


- Roof Shingles removed to the dump site.
- Rood trusses dismantled.
- Wall Framing taken down.
- Flooring removed.
Next Steps:
- Lift the Floor Frame.
- Remove the foundation concrete blocks.
- Install the black plastic sheeting.
 |
| Framing |
 |
| Floor Frame. Not much of the insulation has survived. Why? Was it carted off by critters? |
20 July 2014
Excalibur 2 Project. Shack Rebuild Procedure
PROCEDURE FOR REBUILD OF THE EXCALIBUR SHACK (Known as EXCALIBUR 2)
I thought that this information would add huge value to the Knightlites archives and body of knowledge. After all, Amateur Radio covers not only radio, but a huge range of allied disciplines including the all important construction of the radio shack.
This information was compiled by Sir Marty W4MY. Marty has great experience in construction. The Knightlites have a fantastic range of experiences to draw on. Here is one very practical example. Thanks Sir Marty!
At this stage the shack has been disassembled down to the floor frame. This frame currently sits on concrete blocks a few inches above the ground. The timber used for the floor frame is pressure treated timber.
The original Excalibur 1 shack was a kit purchased from one of the hardware stores in the area and really intended as a garden shed. The aim now is to rebuild the shack and to make it more comfortable for the anticipated many amateur radio operations. Also to ensure that the shack will withstand the test of time.
Herewith the procedure from Sir Marty (format editions and small clarifications by N4HAY).
The rise of EXCALIBUR 2. Shack Rebuild Procedure
1. Lift the floor off its present location and add an additional course of blocks to make the floor clear the ground by 6 inches.
2. Put a single piece of 6 mil plastic sheet directly on the ground under the block stack. If a single sheet is not possible, overlap the seams by12 inches.
3. Place rolled batten insulation and staple between the floor joists with the paper side facing the ground.
4. Install steel flashing between the top course of blocks and lowest part of the wood floor. This is for termite protection. It comes in 6 inch wide strips about 30 gauge thick (1/16" approx). It can be nailed to the bottom of the floor in the area where it will rest on the top course of concrete block.
5. Level is very important. Rig a simple "hydraulic" level to do this. You need a bucket of water and about 20 feet of clear fish tank tubing.
6. Install the sub floor. This must be 5/8" C-D plywood with the "C" side facing up.
7. Place roofing tar paper sheet on top, overlapping about 6" and sealing with general purpose "roofing tar" commonly dispensed in a caulk tube.
8. Frame the walls, door, and windows on top of the sub floor.
9. Place OSB board on the outside of the wall framework.
10. Frame roof and ceiling. Use 1/2" plywood on roof, not OSB.
11. Do not sheet ceiling or soffits at this time.
12. Install ridge vent, tar paper, drip edge and shingles on roof.
13. Structure is now "dried in"
14. Install Owens Corning 1/2" foam board on top of OSB walls,
15. Wrap entire four walls with Tyvek vapor barrier.
16. Cut out windows and door openings.
17. Seal edges of Tyvek with construction adhesive.
18. Install finish floor on top of tar paper with 1/2" "Pressboard". Not OSB
19. Sheet facia and soffits and install soffit vents.
20. Install electrical wiring.
21. Install batt insulation on walls between the studs, paper side facing inside.
22. Install batt insulation between ceiling rafters with paper side facing down.
23. Sheet interior walls and ceiling with 3/8" drywall.
24. Finish interior drywall and seal.
25. Install siding to exterior walls,
26. Paint/finish as required.
27. Finish floor (Linoleum suggested)
28. Hang windows and doors
29. Finish interior trim.
30. Paint inside.
31. Move/Build furniture
32. Knightlights enjoy!
13 July 2014
Excalibur 2 Project. Roof removed.
The roof has now been removed.
Thank you to the man (or woman) who invented the crow bar...
Next step will be to clean up and remove the roof trusses.
Phew this was good exercise!
Thank you to the man (or woman) who invented the crow bar...
Next step will be to clean up and remove the roof trusses.
Phew this was good exercise!
 |
| Tools for the job. QROO, QRO, QRP, QRPp |
 |
| Hurricane! |
Field Day 2014
The Knightlites (www.knightlites.org) field day operation this year was superb. Everything about the event was pure enjoyment. Thank you to all who contributed to make this the best ham radio event I have ever experienced!
Thank you.
Here below enjoy the details and some pics.
BACKGROUND
Dates: 06/28/2014 - 06/29/2014
Times; 1800 UTC Saturday through to 2059 UTC Sunday
Location: 35.631, -78.692. Horse Pastures at the farm of Paul AA4XX
WX: Mild and Dry. Excellent
Propagation: (ARLP026), Solar Flux 100,105. A Index 8,12. 10m and 6m bands did not open
LOGGING SOFTWARE: N1MM used by all stations.
OPERATORS:
Sirs:
AA4XX Paul
W4MY Marty
WD4NAL Julius
WA4GIR Joe
N3GO Gary
WF4I Derek
KD4PBJ Chris
TBD Alex (Harmonic of Sir Chris)
AB4PP JP
N4HAY Dick
KC4PHJ Alex
WN4OFT John
VISITORS:
Sirs:
KK4BVN Dan
W4USR Dennis
Chris, harmonic of Sir JP's AB4PP
Ty, harmonic of Chris and sub harmonic of AB4PP
Brian friend of Chris
AJ4MJ Justin and harmonic Lizzie
W4VOC Doug (Whiskey 4 Voice of Carolina)
K4PHS Pete
Ladies:
Kim (Marty's XYL) and Kim's friend, Tina
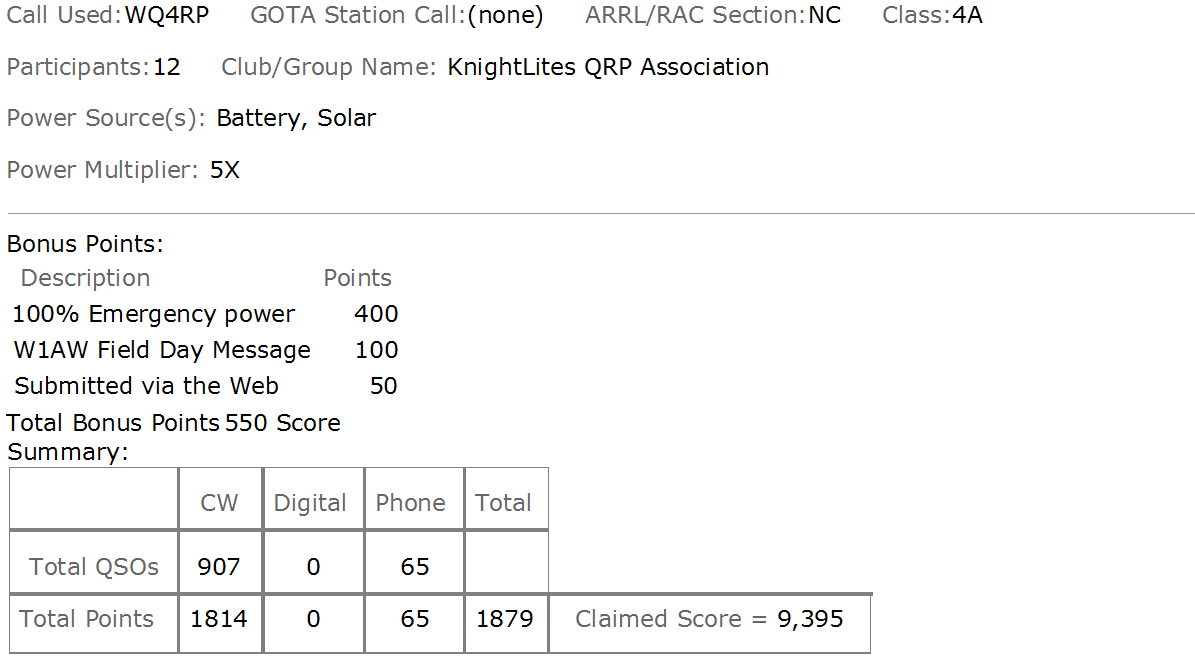
RESULTS:

OPERATING CONDITIONS

BANDPASS FILTERS: Reference http://www.kitsandparts.com/W3NQN_May_June_1998_QST.pdf
Used on all HF Bands
TRIPLEXER: Reference June 2010 QST by K6KV. Interfaced to the KLM 10m, 15m, 20m Yago array and to the 3 accompanying stations.
POWER
12V Battery system supplied by Solar Power. Laptops ran on inverters which were powered by the 12V Battery systems. More details as follows:
AC Delco Marine deep-cycle battery, 95 ahr reserve capacity (@20A/hr rate)
PowerFilm R-13 flexible solar "panel" providing 13mA charging at greater than 12VDC in full sun
Charge controller is a SunGuard 12V/4.5A unit
MAST
Field deployable 50ft, sectioned, Aluminum Mast from the Vietnam Era and used to deploy point to point microwave horns by the US military. More details to be provided by W4MY)


Thank you.
Here below enjoy the details and some pics.
BACKGROUND
Dates: 06/28/2014 - 06/29/2014
Times; 1800 UTC Saturday through to 2059 UTC Sunday
Location: 35.631, -78.692. Horse Pastures at the farm of Paul AA4XX
WX: Mild and Dry. Excellent
Propagation: (ARLP026), Solar Flux 100,105. A Index 8,12. 10m and 6m bands did not open
LOGGING SOFTWARE: N1MM used by all stations.
OPERATORS:
Sirs:
AA4XX Paul
W4MY Marty
WD4NAL Julius
WA4GIR Joe
N3GO Gary
WF4I Derek
KD4PBJ Chris
TBD Alex (Harmonic of Sir Chris)
AB4PP JP
N4HAY Dick
KC4PHJ Alex
WN4OFT John
VISITORS:
Sirs:
KK4BVN Dan
W4USR Dennis
Chris, harmonic of Sir JP's AB4PP
Ty, harmonic of Chris and sub harmonic of AB4PP
Brian friend of Chris
AJ4MJ Justin and harmonic Lizzie
W4VOC Doug (Whiskey 4 Voice of Carolina)
K4PHS Pete
Ladies:
Kim (Marty's XYL) and Kim's friend, Tina
RESULTS:
OPERATING CONDITIONS
BANDPASS FILTERS: Reference http://www.kitsandparts.com/W3NQN_May_June_1998_QST.pdf
Used on all HF Bands
TRIPLEXER: Reference June 2010 QST by K6KV. Interfaced to the KLM 10m, 15m, 20m Yago array and to the 3 accompanying stations.
POWER
12V Battery system supplied by Solar Power. Laptops ran on inverters which were powered by the 12V Battery systems. More details as follows:
AC Delco Marine deep-cycle battery, 95 ahr reserve capacity (@20A/hr rate)
PowerFilm R-13 flexible solar "panel" providing 13mA charging at greater than 12VDC in full sun
Charge controller is a SunGuard 12V/4.5A unit
Field deployable 50ft, sectioned, Aluminum Mast from the Vietnam Era and used to deploy point to point microwave horns by the US military. More details to be provided by W4MY)
 |
| Sirs: AA4XX(Paul), KC4PHJ(Alex), N3GO(Gary), WA4GIR(Joe). Coupling to Sir Gary's FB Broadcast Band Rx Loop |
 |
| Intense discussion about important matters! Sirs: AB4PP(JP), WN4OFT(John), AA4XX(Paul), WF4I(Derek), WD4NAL(Julius), KC4PHK(Alex), KK4BVN(Dan) |
 |
| Sir Gary N3GO looking for the tuning knob |
 |
| Tent City with Sir Marty W4MY's Rocket Launcher Mast. Vietnam Era. |
 |
| Sir Chris (harmonic of Sir JP AB4PP) gave us a superb demo of his Drone system. Thanks Chris! Now how can we use one to hold up a TopBand vertical? |
 |
| Sir Chris with the Knights looking on as the drone sends hi def video back to earth |
 |
| Sir Dennis W4USR and Sir Doug W4VOC waxiing lyrical during their visit. |
 |
| Sir Marty's Teardrop QRP accommodation and accompanying social tent and kitchen. We had some fantastic eyeball ragchews in this area. |
 |
| Left 6M/2M tent. Center 20m, 15m stations & Right was the 10m tent. |
 |
| Sir Marty's main Boma where the Indaba takes place (as we would say in Africa) |
 |
| Sir JP operating the 40m station and using the KX3. Supplied by Sir Joe WA4GIR. Thanks Joe! |
 |
| CQ Field Day! Harmonic Sir Alex working FD stations under the watchful eye of Sir Chris. Well it doesn't get better than this! Chris says that Alex has been asking a lot of questions about Ham Radio since FD. WAYTAGO! |
 |
| View from the 20m position. The Argo VI paired with the KLM Yagi was a superb setup. Thanks Sir Marty and Sir Paul! |
 |
| The Rocket Launcher supporting the HF, 6M and 2M antennas |
 |
| Pure beauty! |
 |
| Sir Marty beginning the take down. What a wonderful set up this was! |
72 de Dick N4HAY
Subscribe to:
Posts (Atom)